A Data Collection Workbook or DCW can help ensure that your clients provides everything you will need for your build. This will prevent any confusion on what the Client is expecting, and in turn will help in speeding up the implementation process. The DCW provides an easy way for the client fill out the different components of your build. Including Locations, Providers, Schedules, Insurance, Screening Questions and Users.
There are two types of DCW’s. Integrated and Non Integrated. .
Integrated DCW
An Integrated DCW comes into play when the build requires InQuicker to be integrated with the a Clients EMR. This enables InQuicker’s adapters to sync in all the Provider, Location and Appointment Type ID’s that it will require in order to dynamically update the InQuicker schedules based on the Providers availability.
Non Integrated DCW
The Non Integrated DCW would come into use when you are not linked to the Clients EMR.. For example Schedules like Emergency Rooms and Urgent cares are usually non integrated as there are no actual appointments to pull in and instead you need to manually create appointment slots.
Tabs
There are different tabs within the DWC, depending on if your build is an Integrated or Non Integrated.
Contacts and Dates Tab
This tab is where you would fill in all the important Dates for your Project as well as information on your stake holders and even information about what EMR your are going to integrate with. *If Applicable.
Important Project Milestone Dates

Here you will simply fill out any Dates that are important to the Project including Dates on when Meetings will take place and key milestones, like when the DCW should be returned, when the build is going to be complete or when a Training session should be scheduled.
Inquicker Contacts

This is an area where you can fill out who will be working on the project along with the Account or Project Manager that will be associated with the project.
Customer Contacts

Customer Contacts is where you would enter all the key stakeholders involved on the client side.
You will also see any area at the bottom left for Integration information for integrated builds

Locations Tab


The location’s tab provides the client all they will need in order to fill out their Facility and Location information. You can then use this information to build out your facility/locations.
The following Tabs are presented to the client. Some are optional and some are not.
- Region
- LocationID
- Facility
- Location
- Facility Type (patient Facing)
- Facility Website
- Timezone
- Address
- City
- State
- Zip Code
- Phone Number
- Time Before Availability
Region
The Region name is the name of the Region in which the Facility will be contained. This is optional because not all Health Systems contain Regions.
Location ID (Integrated only)
The Location ID is the ID that is linked to that particular Location or Department on client’s EMR. This is not applicable to Non Integrated schedules.
Facility
The Facility Name is the name of the Facility that will house your locations. Most of the time The Facility and Location are the same but you can have more then one Location per Facility. The facility name should be a client facing name.
Location
The Location Name is the location that is held within your facility. Most of the time they are one in the same, but you can have more than one location within a facility. If this is the case the client would enter the same facility name in the facility column for all locations and then enter each of the locations on their own row. Location IDs are linked to Locations and not facilities. Locations are also patient facing
Facility Type (patient Facing)
The Facility type is the type of facility you are building, For Integrated accounts the most common Facility types are Primary Care and Access center and for non-integrated, they are Emergency Department and Urgent Care Center.
Facility Website
The Facility Website is there so the client can fill out the email address for the facility if applicable. This is an optional field.
Timezone
The Time Zone column is where the client would enter the Time zone of their facility. Time Zones are entered at the facility level.
Address, City, State, Zip Code
The Address, City, State and Zip Code columns are where the client will enter the address details of the Location. Addresses are entered at the Location level.
Phone Number
The phone number field is where the client would enter the phone number for that location, Best practice would be to set the phone number here and not at the Provider level.
Time Before Availability
Time Before availability simply means, that when a patient is booking an appointment, what’s the earliest appointment slot do you want them to see. This is set in minutes. For example if a client doesn’t want a patient seeing any appointment until 24 hours out, they would enter 1440 minutes
Provider Tab


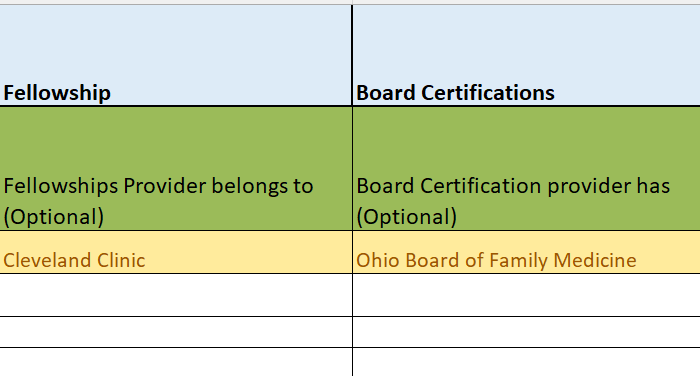
The Provider tab provides the client all they will need in order to fill out their Provider or Resource information. You can then use this information to build out your Providers.
The following Tabs are presented to the client. Some are optional and some are not.
- Provider ID
- Provider Type
- Provider Name
- Suffix (MD, DO, NP, etc)
- Link to Provider Photo
- Gender (M or F)
- Biography
- Phone Number
- Sub Specialties (comma separated)
- Medical or Grad School
- Languages Spoken (comma separated)
- Undergrad School
- Residency
- Fellowship
- Board Certifications
Provider ID (Integrated only)
The Provider ID is the ID that is linked to that particular Provider or Resource on the client’s EMR. This is not applicable for Non Integrated schedules.
Provider Type
The Provider Type Column is where the client would enter if the Provider is Practitioner or a Health Resource.
Provider Name
The Provider Name is where the client would enter the First and Last name of the practitioner or Resource. Provider names are patient facing.
Suffix (MD, DO, FNP, etc)
The Suffix is simple where the client would enter in the abbreviation suffix for that provider if applicable.
Link to Provider Photo
The Link to Provider Photo column is an optional column where they can provider a web link to the provider photo. Most of the time Provider photos are sent separately
Gender (M or F)
The Gender column is where the client would enter the sex of the Provider. At this time there is only an Male and Female option.
Biography
Biographies are optional but if the client chooses, they can enter the practitioners biography details here.
Phone Number
The phone number field is optional, for best practice enter the phone number on the location level unless the provider has their own number they want patients to use.
Sub Specialties (comma separated)
The Sub Specialties column is an optional column to indicate the specialty of the provider, If the provider has more than one, separate them with a comma. This will help you later when it comes to importing.
Medical or Grad School, Languages Spoken (comma separated), Undergrad School, Residency, Fellowship, Board Certifications
The next 6 columns are optional columns, where the client can enter more information about the providers background. Where they went to school or what other languages they speak.
Schedules Tab (Integrated)

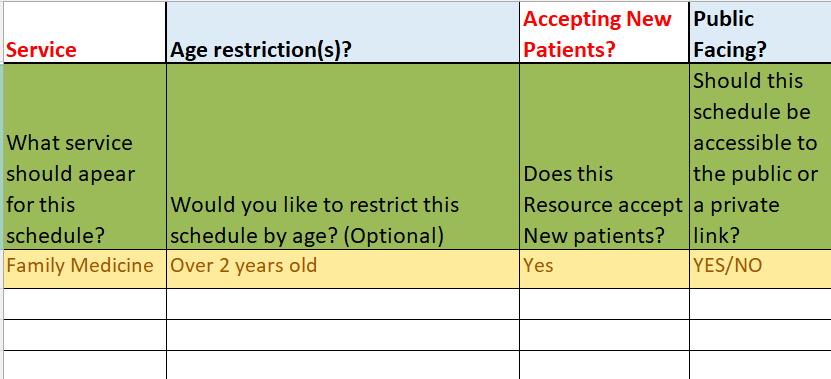

The Schedule tab provides the client all they will need in order to fill out their Scheduling information. You can then use this information to build out your Schedules.
The following Tabs are presented to the client.
- Location ID
- Provider ID
- Facility Name
- Location Name
- Provider Name
- Service Line
- Service
- Age restriction(s)?
- Accepting New Patients?
- Public Facing?
- Visit Type 1
- Visit Type ID 1
- Visit Type 2
- Visit Type ID 2
- Visit Type 3
- ApptType ID 3
- Visit Type 4
- ApptType ID 4
- Visit Type 5
- ApptType ID 5
LocationID (or DepartmentID)
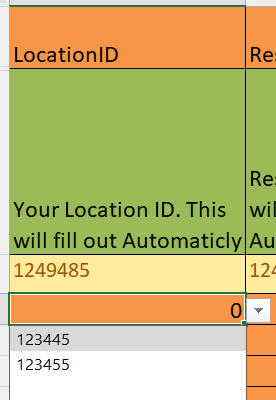
The Location ID or Department ID, depending on the EMR, is filled out by a drop down box. Right clicking on the drop down selection arrow will allow the client to choose the appropriate ID for that schedule. The list of Location ID’s are retrieved from the Locations tab that the client has already filled out.
Provider ID (or Resource ID)
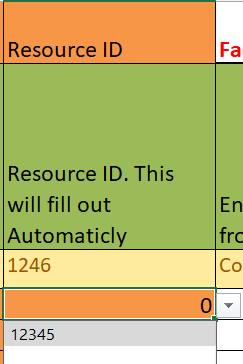
The Provider ID (or Resource ID), depending on the EMR, is filled out by a drop down box. Right clicking on the drop down selection arrow will allow the client to choose the appropriate ID for that schedule. The list of Provider ID’s are retrieved from the Provider Info tab that the client has already filled out.
Facility Name (or Organization name)
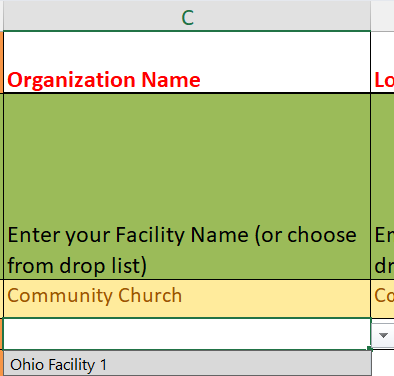
The Facility Name (or Organization name), depending on the EMR, is filled out by a drop down box. Right clicking on the drop down selection arrow will allow the client to choose the appropriate facility name for that schedule. The list of Facilities are retrieved from the Locations tab that the client has already filled out.
Location Name (or Department)
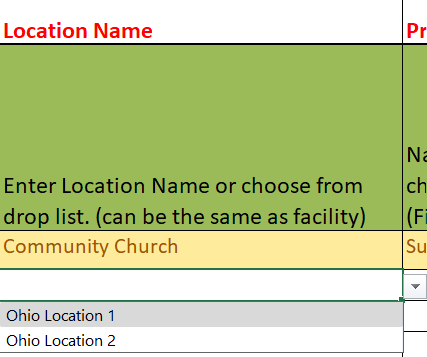
The Location Name (or Department) depending on the EMR, is filled out by a drop down box. Right clicking on the drop down selection arrow will allow the client to choose the appropriate location name for that schedule The list of locations are retrieved from the Locations tab that the client has already filled out.
Provider Name (or Resource)
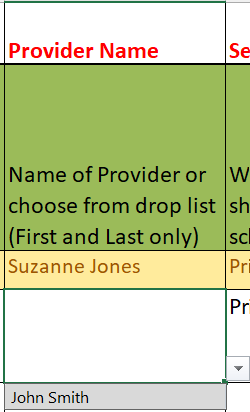
The Provider Name is filled out by a drop down box. Right clicking on the drop down selection arrow will allow the client to choose the appropriate Provider name or Resource for that schedule The list of providers are retrieved from the Provider Info tab that the client has already filled out.
Service Line
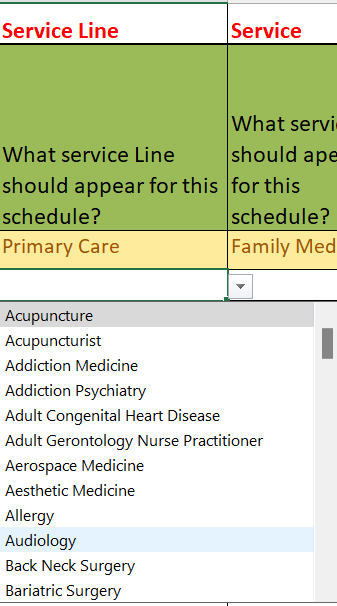
The Service Line is the umbrella in which services fall under. The most common Service lines for an Integrated account are Primary Care and Specialty Care but there are many options for the client to choose from. Right clicking on the drop down selection arrow will allow the client to choose the appropriate Service Line for that schedule.
Service
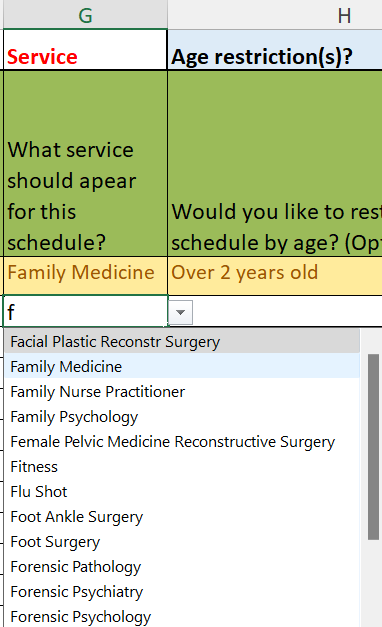
Most Service Lines contain different services within them. For example the most common Services for the Primary Care service line are Family Medicine and Internal Medicine, but there are many options for the client to choose from. Right clicking on the drop down selection arrow will allow the client to choose the appropriate Service for that schedule.
Age restriction(s)?
The Age restrictions column allows the client to restrict that schedule to patient above or below a certain age. For example a pediatric facility often restricts patients from scheduling if they are over 17 years of age. This feature then blocks the patient from scheduling if they state their age at 18 or over when registering.
Accepting New Patients?
If the client wants the schedule to be open to new patients, this is where they would indicate that.
Public Facing?
Sometimes client wants a schedule to not be available to the public and instead be offered as either a discharge schedule, where a patient is sent a link to the schedule or an internal schedule where only the registration person will be able register a patient through their own private link. If this is the case the client would indicate that here.
Visit Type or Events or Appointment Type (s)
The client is offered 5 columns to enter visit types (or Events or Appointment Type) depending on the EMR, these are the appointment types they want offered to the patient for that schedule. The client needs to list every appointment type they want offered for that schedule in its own column.
Visit Type ID or Event ID or Appointment Type ID (s)
The client is offered 5 columns to enter visit type IDs (or Event IDs or Appointment Type IDs) depending on the EMR, these are the appointment types IDs linked to the Appointments types they want offered to the patient for that schedule. The client needs to list every appointment type ID they want offered for that schedule in its own column.
Schedules Tab (Non Integrated)


The Scheduling Tab for Non Integrated Schedules is similar to Integrated except instead of availability being created for the schedule via the integration, the availability needs to be created manually.
The following Tabs are presented to the client.
- Facility Name
- Location Name
- Resource Name
- Service Line
- Service
- Age restriction(s)?
- Accepting New Patients?
- Discharge?
- Duration (minutes)
- All Day Every Day
- Monday
- Tuesday
- Wednesday
- Thursday
- Friday
- Saturday
- Sunday
Facility Name
See Facility Name on the Integrated Schedule
Location Name
See Location Name on the Integrated Schedule
Resource Name
See Provider Name on Integrated Schedule
Service Line
See Service Line on Integrated Schedule
Service
See Service on Integrated Schedule
Age restriction(s)?
See Age restriction(s)? on Integrated Schedule
Accepting New Patients?
See Accepting New Patients? on Integrated Schedule
Discharge?
See Public Facing? on Integrated Schedule
Duration (minutes)
The Duration (Minutes) column indicates the time slot length for the appointment. This is indicated in minutes. The time slot options are in 5 minutes increments from 5 minutes to 60 minutes.
All Day Every Day
The All Day Every Day column, allows the client to bypass manually stating what scheduling times should be available and instead just having the schedule available 24/7.
Monday, Tuesday, Wednesday, Thursday, Friday, Saturday, Sunday

The Columns which state the different days of the week, allows the client to indicate what times in that particular day they want to have availability for scheduling.
Notifications Tab

The Notifications Tab is where the Client lists where notifications should go to. The facility can be sent Notifications on when a new patients books a time slot or if a patient cancels (along with other things)
Here are the columns associated with the Notification tab
LocationID
Facility
Location
Notification Types
Notification Method (Phone, Fax, Email, Text, or Page)
Send To: (Enter actual number/email)
LocationID (Integrated only)
The Location ID or Department ID, depending on the EMR, is filled out by a drop down box. Right clicking on the drop down selection arrow will allow the client to choose the appropriate ID for that notification. The list of Location ID’s are retrieved from the Locations tab that the client has already filled out. The client would indicate one Location ID per Notification Type or Method.
Facility
The Facility (or Organization), depending on the EMR, is filled out by a drop down box. Right clicking on the drop down selection arrow will allow the client to choose the appropriate facility name for that notification. The list of Facilities are retrieved from the Locations tab that the client has already filled out. The client would indicate one Facility per Notification Type or Method.
Location
The Location (or Department) depending on the EMR, is filled out by a drop down box. Right clicking on the drop down selection arrow will allow the client to choose the appropriate location name for that notification. The list of locations are retrieved from the Locations tab that the client has already filled out. The client would indicate one Location per Notification Type or Method.
Notification Types
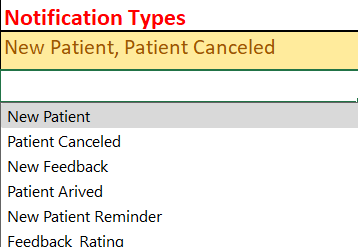
The Notification Type indicates what events would client like to trigger a notification to be sent. The most common options are when a New Patient books an appointment or when a patient cancels but there are several options to choose from. The client would indicate one type per row.
Notification Method
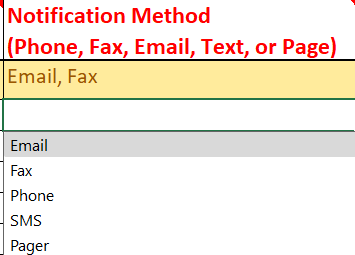
Notification Method indicate the method the client would like their notification to be sent. The most common options are Fax and Email but there a several choices the client can choose from. The client would indicate one method per row.
Send To
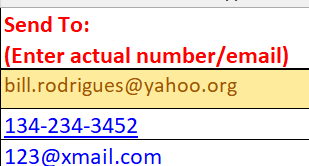
The Sent To column is where the client would list the actual send to Number or email address they want linked to the Notification Method. The client would indicate one “Send To” per row.
Insurance Tab

The insurance Tab presents the client the opportunity to list the insurance plans that are available to their schedules. Best Practice Indicates that Insurance be linked at Service Level as it keep maintenance to a manageable level but If the client chooses they are able to get more granular.
Below are the columns associated with the Insurance Tab.
- Health System
- Region
- Service
- Facility
- Location
- Accepted Insurance Company
- Plan Name
Health System
If the client chooses the can simply state the Health system Level is where they want all insurance linked. They would simply indicate that in the Health System Column by adding the health system name and leaving the rest of the levels blank
Region
If the client chooses to have their Insurance presented at the Region Level . They would simply indicate that in the Region Column by adding the Region name and leaving the rest of the levels blank.
Service (best Practice)
If the client chooses to have their Insurance presented at the Service Level . They would simply indicate that in the Service Column by adding the Region name and leaving the rest of the levels blank
Facility
If the client chooses to have their Insurance presented at the Facility Level . They would simply indicate that in the Facility Column by adding the Facility name and leaving the rest of the levels blank
Location
If the client chooses to have their Insurance presented at the Location Level . They would simply indicate that in the Location Column by adding the Location name and leaving the rest of the levels blank
Accepted Insurance Company
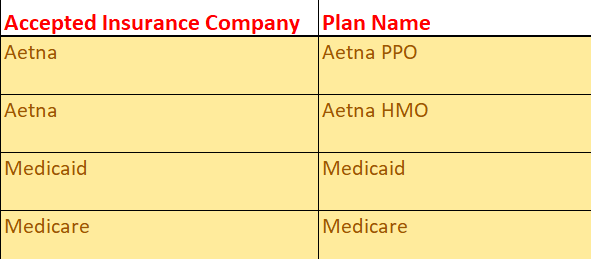
In the Accepted Insurance Company column, the client would list all the insurance companies that are available to their schedules. If a company has more than one plan they would list the company name multiple times.
Plan Name
In the Plan Name column, the client would list all the insurance plans that are available to their schedules. Each plan must be listed next to its parent company.
Users Tab

The Users tab allows the client to indicate which staff members they would like to be offered access to the InQuicker Console. Having access to the console presents the ability to self-manager appointments, notifications and even schedules (non-integrated). They also would be able to view stats as well as charts.
Below are the columns associated with the Users Tab.
- User Name (First Last)
- Username
- Email Address
- Facility Needing Access To
- Location Needing Access To
- Role (Admin, Reg, Nurse)
- LocationID
User Name (First Last)
In the Use Name Tab, the client would list out the First and Last names of anyone to whom they would like to grant access to the console.
Username
In the Username Tab is an option tab, where the client would list out the Username of anyone to whom they would like to grant access to the console. The system has the ability to generate it’s own usernames based on the email address but if the client would like something different they can list that out here.
Email Address
In the Email Address Tab, the client would list out the Email Address of anyone to whom they would like to grant access to the console.
Facility Needing Access To
If the client chooses to only grant a staff member access to a certain facility they can indicated that here. Facility Needing Access To.. is filled out by a drop down box. Right clicking on the drop down selection arrow will allow the client to choose the appropriate facility name for that user. The list of Facilities are retrieved from the Locations tab that the client has already filled out.
Location Needing Access To
If the client chooses to only grant a staff member access to a certain facility they can indicated that here. Location Needing Access To.. is filled out by a drop down box. Right clicking on the drop down selection arrow will allow the client to choose the appropriate facility name for that user. The list of Location are retrieved from the Locations tab that the client has already filled out.
Role
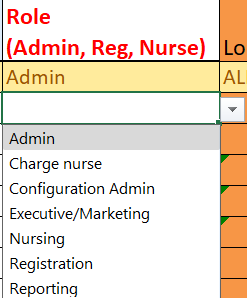
There are different Roles that can be linked to a user where different access is granted, depending on the role. For example if the client wants the staff member to have unlimited access to view and do most things they would give them the Admin Role. Otherwise they should give them a lesser role.

LocationID (integrated Only)
The Location ID or Department ID, depending on the EMR, is filled out by a drop down box. Right clicking on the drop down selection arrow will allow the client to choose the appropriate ID for that notification. The list of Location ID’s are retrieved from the Locations tab that the client has already filled out.
Screening Questions Tab

Screening Questions are a great way for a client to make sure that the right patients are guided to the correct appointments. Screening Questions can be a simple Acknowledgment or a complex series of question. Best practice is that clients keep the number of questions to a minimum in order to not deter a patient for scheduling.
Below are the columns associated with the Screening Questions Tab
- Question/Message
- Condition
- Action
- Special Instructions
Question/Message
In the Question/Message column, The client has the ability to list out questions they would like the patient to answer before they can register. If the client has more than one question they would like to ask, they would state one question per row.
Condition
The Condition column is where they client can direct their patient depending on if they answer yes, no or OK to their question. Their answer is directly linked to the Action column.
Action
The Action column asks the question.. What would you like to happened if the patient answers yes, no or OK to the question? They might want them to continue, proceed to register or stop them from registering all together.
Special Instructions
If the client has any special requests for that screening question, or if they just want to state how they would like it to be linked.. For example, “I would like this screening question to pop up when the patient chooses this appointment type, at this location” They would state that in the Special Instructions column.
Holidays Tab (Non Integrated)


The Holidays tab is a Non Integrated method allowing the client to state which holidays they want their scheduling to be blocked for.
Below are the columns associated with the Holidays Tab
- Facility
- Location
- MLK
- Presidents
- Good Friday
- Easter
- Memorial Day
- Independence Day
- Labor Day
- Columbus Day
- Veterans Day
- Thanksgiving
- Day After Thanksgiving
- Christmas Eve
- Christmas Day
- New Year’s Eve
- New Year’s Day
Facility
If the client chooses to have the holiday blocking at the Facility Level . They would simply indicate that in the Facility column by adding the Facility name. The list of Facilities are retrieved from the Locations tab that the client has already filled out.
Location
If the client chooses to have the holiday blocking at the Location Level . They would simply indicate that in the Location column by adding the Location name. The list of Locations are retrieved from the Locations tab that the client has already filled out.
MLK, Presidents, Good Friday, Easter, Memorial Day, Independence Day, Labor Day, Columbus Day, Veterans Day, Thanksgiving, Day After Thanksgiving, Christmas Eve, Christmas Day, New Year’s Eve, New Year’s Day
There are eleven holidays listed for the client to choose from in order to block off scheduling. To block a holiday, the client would simply indicated that with an X under that holiday’s column.


